Aug 28th 2024
How to Measure Thread Size, Pitch, and Angle
Understanding and knowing how to measure thread size, pitch, and angle are important for any DIYer or professional. These three parameters determine how well fasteners and fittings will fit together. This is critical for preventing issues like leaks, loose connections, or even structural failures.
This guide goes over the different methods you can use to measure thread size, pitch, and angle to help you choose the right connections for your projects.
Understanding Thread Size and Pitch

Thread Size
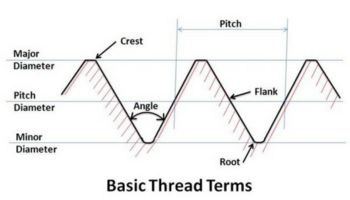
Thread size refers to the diameter of the threaded part. For external threads, like those on a bolt, it’s the distance across the peaks of the threads. For internal threads, such as those inside a nut, the measurement is taken across the valleys. The thread size is typically expressed in inches for imperial measurements or millimeters for metric threads.
Thread Pitch
Thread pitch is the distance between adjacent threads. In imperial measurements, the pitch is written as threads per inch (TPI). For metric threads, pitch is the distance between threads in millimeters. Even if two threaded components have the same diameter, they won't fit together properly if their pitches don't match.
Thread Angle
The thread angle is the angle between the sides, or flanks, of the thread. Most standard threads you'll come across have a 60-degree angle. Some specialized threads, like NPT threads in plumbing and on our valves, will have different angles. This measurement is important when you’re working with high-precision components or to avoid issues like cross-threading or leaks
The thread angle is the angle formed between the sides, or flanks, of the thread when viewed in cross-section. Most standard threads feature a 60-degree angle, but specialized threads, such as NPT threads used in plumbing, may have different angles. This measurement is important for high-precision components and avoiding issues like cross-threading or leaks.
How to Measure Thread Size and Pitch

Measuring Pitch with a Thread Pitch Gauge
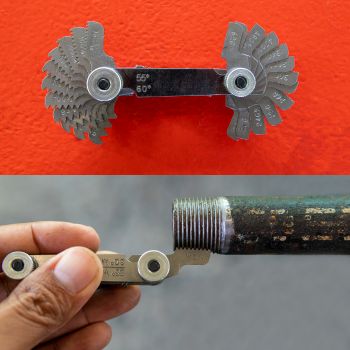
As the name suggests, a thread pitch gauge is made specifically to measure thread pitch. It consists of a series of toothed metal blades, with each blade corresponding to a specific pitch.
These are ideal for those who frequently work with different thread sizes. This tool is perfect for on-site measurements where speed is important.
How to Use It:
- Clean the threads you want to measure
- Choose a blade that looks like it matches the thread spacing
- Place the blade against the threads. Alight the teeth with the thread grooves
- If the blade fits snugly without gaps, you found the correct pitch. If it doesn’t, try a different blade. The correct blade will fit snugly into the threads without any gaps when you have the right measurement.
- Once you find a match, note the pitch value marked on the matching blade.
Measuring Thread Diameter and Pitch with Calipers
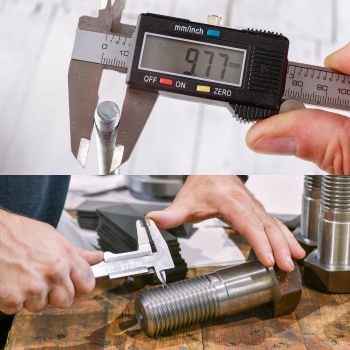
 Calipers, especially digital or vernier calipers, are precision tools that can measure internal and external dimensions, including thread diameters. They are a must-have in any toolbox for anyone dealing with precise measurements.
Calipers are a must-have tool for scenarios that demand precise measurements, such as machining, plumbing, or working with custom or non-standard thread sizes
How to Measure Thread Diameter with Calipers:
- For external threads: Open the calipers wider than the thread diameter and place the outer jaws over the threads. Gently close the jaws until they touch the peaks on both sides, then read the measurement on the scale
- For internal threads: Insert the inner jaws into the threaded hole. Expand them until they touch the valleys on both sides, and then read the measurement.
How to Measure Thread Pitch with Calipers:
Calipers can also be used to measure thread pitch, which is helpful when you don’t have a pitch gauge on you.
- Place the calipers across a set number of threads and measure the distance
- Divide the length by the number of threads you measured
- For imperial threads, divide 1 inch by this number to get threads per inch (TPI)
- For metric threads, this measurement gives you the pitch in millimeters
Example: You measure the distance across 10 threads and it totals 12.7mm (0.5 inches). Divide 12.7mm by 10 to get a pitch of 1.27mm. For imperial threads, take 1 inch divided by 0.5 inches, which gives you 2, meaning the threads have 20 TPI.
Using a Ruler or Measuring Tape for Thread Pitch and Diameter
Specialized tools like a thread pitch gauge or calipers may not be available to you. A simple ruler or measuring tape can quickly provide a rough estimate of thread pitch and diameter. This is less precise, but useful.
These tools are suitable for quick, rough measurements when precision tools aren’t accessible. If your project demands high accuracy, like in plumbing or machinery, always follow up with precision instruments to verify your findings.
How to Measure Thread Diameter with a Ruler
- For external threads: Place the ruler perpendicular to the threaded shaft, aligning the edge with one thread peak. Measure across to the opposite peak.
- For internal threads: It’s more challenging with a ruler, but you can measure the outer diameter of a bolt that fits the threaded hole for an estimate.
How to Measure Thread Pitch with a Ruler:
- For imperial threads: Place the ruler along the threaded portion and count the number of peaks over a 1-inch span to get the TPI.
- For metric threads: Measure the distance between several threads, then divide by the number of spaces to get the pitch in millimeters.
Matching with a Known Thread
If you don’t have measuring tools but have a reference sample, thread matching can help identify the size and pitch pretty easily.
This method is useful when you need a quick identification without precision tools, commonly in workshops or garages with a variety of bolts and nuts on hand.
How to Match Threads:
- Use a Thread Chart or Sample: Find a bolt, screw, or fitting with a known size and pitch. Compare it side by side with the unknown thread. If they align perfectly, you’ve got a match.
- Use a Nut or Bolt Tester: Thread the unknown bolt into a nut tester or bolt it into a known nut. If it screws in smoothly, the threads are the same.
Measuring the Thread Angle
Measuring the thread angle is crucial when precise alignment is necessary, such as in high-stakes applications like aerospace or hydraulic systems. Getting the correct angle helps prevent cross-threading and ensures a secure fit.
This method is particularly useful in quality control processes or when working with components that require high precision.
How to Measure Thread Angle:
- Use a thread angle gauge or optical comparator
- Place the gauge against the thread profile
- Align the gauge lines with the thread flanks
- Read the angle where the gauge lines match the thread profile perfectly
- Check the thread angle at multiple points to confirm consistency
Tips for Accurate Measurements
- Clean Threads Before Measuring: Dirt and debris can throw off your readings.
- Double-Check Your Measurements: Measuring multiple times helps ensure accuracy.
- Use Proper Lighting: This helps you see the threads clearly, especially for fine pitches.
- Handle Tools with Care: Maintain your tools so they remain accurate.
Conclusion
Accurate thread measurements are crucial for ensuring components fit and function correctly.These measurements are particularly important when dealing with specialized equipment, such as the solenoid valves available at ElectricSolenoidValves.com. Knowing how to measure threads accurately can save time, prevent costly mistakes, and ensure the optimal performance of your systems.
Whether you’re a DIY enthusiast or a professional, using the right tools and techniques can make all the difference. From thread pitch gauges to calipers, each method offers unique benefits depending on your needs. Always clean and double-check your measurements, and don’t hesitate to use multiple methods to confirm your findings. By following these guidelines, you can ensure a proper fit and avoid costly mistakes. Contact us to learn more.

